Kuote: An Online E-learning Framework
By
Kyle Hall
Table of Contents
2. Review of Existing FOSS E-Learning
Systems
4.1. Kuote From User’s Perspective
4.2. Moving Through Kuote: An
Instructor’s Point of View
Adding
Questions to a Learning
4.3. Switching Gears: Kuote From A
Student’s Perspective
Enrolling
in a Course Offering
4.4. The Instructors Interface:
Revisited
Updating
Courses, Learnings, and Questions
5. Kuote From A Developer’s Perspective
5.3. How Data Flows Through Kuote
5.4.1. User Interface Customizability
6.1. Use a Version Control System.
6.2. Use an Object Oriented Language.
6.4. Write for Understandability, not
Speed or Cleverness.
6.5. Document, Document, Document.
6.6. Write for Future Flexibility.
6.7. Leverage Existing Libraries
6.8. Be Careful When Choosing Libraries
to Use.
1. Introduction
Kuote is a simple to use, online E-learning system. E-learning is considered to be the delivery of a learning, training or educational programs by electronic means. E-learning involves the use of a computer or electronic device to provide said training, educational or learning material. Kuote is an acronym for Kuote Universal Online Tutorial/Testing Environment.
This study was based upon the concept of designing and coding an online tutorial and testing system that education professionals could use to create small tutorials with an online interactive test at the end of the tutorial. The pre-quiz tutorial could also simply be taught in class and the quiz for it is made available online. The system is primarily designed as a useful alternative to homework that would provide detailed statistics to the class’s professor, allowing the professor to improve the quality of the class through quick and detailed feedback from the students.
This project will necessitated the use of a large volume of knowledge that I have acquired from my IT classes, including the use of Network Technology, Database Management, Project Management, Information System Analysis & Design, Web Systems & Interface Design, Internet Technology, and Electronic Security.
2. Review of Existing FOSS E-Learning Systems
2.1. ATutor
ATutor is an Open Source Web-based Learning Content Management System (LCMS) designed with accessibility and adaptability in mind. Administrators can install or update ATutor in minutes, develop custom templates to give ATutor a new look, and easily extend its functionality with feature modules. Educators can quickly assemble, package, and redistribute Web-based instructional content, easily retrieve and import prepackaged content, and conduct their courses online. Students learn in an adaptive learning environment.
Pro’s:
- Easy to install.
- Templating.
- Extendable functionality.
Con’s
- Complex file structure.
- Many complex modules that are unlikely to be used, system attempts to be everything to everyone with File storage, blogs, online chat, polls, web search, RSS feeds, etc.
- Not friendly for less advanced users.

2.2. Claroline
Claroline is a free application based on PHP/MySQL allowing teachers or education organizations to create and administrate courses through the web.
Pro’s:
- Clean interface.
- Reasonably simple design.
Con’s:
- No distinction between instructors and students. Anyone can create a course.
- Not written by native English speakers. Includes many examples of poor English.
- No templating system.

2.3. Dokeos
Dokeos is an Open Source elearning and course management web application translated in 34 languages and helping more than 1.000 organisations worldwide to manage learning and collaboration activities.
Pro’s:
- Simple interface.
Con’s
- No templating system.
- Complex E-Learning creation tools.
- English version shows many grammar errors.

2.4. Moodle
Moodle is a course management system (CMS) - a free, Open Source software package designed using sound pedagogical principles, to help educators create effective online learning communities. You can download and use it on any computer you have handy (including webhosts), yet it can scale from a single-teacher site to a 50,000-student University.
Pros:
- Very popular open source E-Learning system.
- Well documented.
- Strong community.
- Themeable.
- Extensible via plugins.
Cons:
- Extremely complex.
- Steep learning curve.

3. Methodology
The review of existing open source E-Learning frameworks suggests that yet another E-Learning system would be unnecessary and superfluous, yet I do not believe that to be true.
I decided to write Kuote because I have found most existing E-learning systems to be very complicated, and downright intimidating for many computer users. The goal of Kuote is to be an E-learning system that anybody can sit down and use without resorting to a manual. It is designed to make each step in the process of creating and offering E-learnings as obvious and dead-simple as possible.
Why should simplicity be the goal of an E-learning system? It is my belief that, in general, the more complicated and thus the more difficult a system is to use, the less likely it is that anyone will use it. One must simply look at the availability of E-learning systems at schools and universities compared to the actual use of said systems to see this conclusion is likely.
After hundreds of man-hours invested, the work of developing Kuote has come to fruition. This document is a testament of that work and that goal.
4. Exploring Kuote
4.1. Kuote From User’s Perspective
In Kuote, there are only two types of users, students and instructors. I have used the general term instructor in lieu of teacher or professor to promote the system as being usable at all levels of education. It’s design is intended to complement the inner workings of a university or school system, but it’s flexibility allows it to be used in many other circumstances.
Instructors have the ability to create new courses, learnings, and questions. And also the ability to offer courses and learnings. In reference to Kuote, a course is a collection of learnings. A learning is defined as the combination of a tutorial, and a quiz of related questions. Within Kuote, each learning may have either a tutorial, a quiz, or both.
Each quiz must have one or more questions. A question consists of an actual question that has between two and five multiple choice options. Every question also has a correct answer (of course), a difficulty rating, and an optional time-limit for answering the question.
Each tutorial must be a single html file only. However, as the focus of Kuote is to be easy-to-use, one of the primary future development goals is to allow direct importation of PowerPoint documents, PDF files, Flash movies, and other formats commonly used for presentation purposes.
As mentioned earlier, each course and learning may be offered zero or more times. A course offering in Kuote is analogous to a course offering at a university. It makes available for enrollment a particular course and its learnings for a given timeframe. This design is meant to complement and mirror a school’s system of offering classes for enrollment. If an instructor utilizes Kuote, they can enroll in the Kuote course offering after enrolling in the school’s course offering.
The point of enrolling in a course offering is so that a student may take the learnings that have been made available under that course offering. Instead of just laying out all the learnings that have been created under the offered course, the instructor gets to choose when to make each learning available for the student to take. He or she can even re-offer a learning if a reiteration of the material is necessary for the class.
4.2. Moving Through Kuote: An Instructor’s Point of View
Now that essential concepts of the Kuote system have been outlined, a walk through of the process of creating a course, a learning, questions for a learning, and the offering of this course and learning is in order.
Logging in to Kuote
First things first. Log into Kuote. The login page is designed so that it may be customized to give it the look of the school’s web portal, if such customization is warranted.

Figure I - Kuote Login Page
Creating A Course
After logging in, the first screen that is seen is the “Create Course” screen. Here the instructor can create a new course under which to add learnings. The course is given a title and a short, one-line description. Next the instructor must decide if other instructors may offer this course, i.e. the course is open, and if the course may be taken by anyone, i.e. the course is public. Once the Submit button is pressed, the instructor is presented a screen that confirms the successful creation of his or her new course.

Figure II - Create Course
Creating a Learning
Now that the instructor has a course, he or she needs to make it useful by creating at least one learning to be part of the course. Here the instructor can choose which course the learning is part of, give the learning a title, a short description, and optionally upload an html file that contains the tutorial for this learning.


Figure III - Create Learning
Adding Questions to a Learning
The instructor has now created a new course, and a new learning that has a tutorial. Now he or she can add questions to the learning so that the instructor may quiz his or her students on what they’ve learned in the tutorial.
If the instructor clicks the “Questions” side-tab under the “Create” tab, he or she can begin creating questions. The instructor is first asked which course the questions go under, and then which learning they are part of.
As you can see in Figure IV, to create a question the instructor will enter the actual ‘question’ and then a number of multiple-choice answers, from two to five choices. A true/false question be creating simply by making the first two choices ‘true’ and ‘false’ respectively.
Next he or she will select which choice is the correct answer. Optionally, the instructor can rate its difficulty and give it the quiz takers a limited amount of time in which to answer the question. Upon pressing “Add Question”, a new “Add Question” screen is redisplayed, with the question number updated to reflect that there is already one question that is part of the learning, as seen in Figure V. One may also notice that a person can use html tags in the question’s body and options to add emphasis to the text. Later, the instructor can come back to this page and add as many additional Questions to the Learning as the person may wish.

Figure IV - Create New Question

Figure V - Create New Question, 2nd Question
Taking a Test Drive
Before the
instructor offers this course and learning for students to take, he or she may
first try it out themselves to make sure they have not made any mistakes such
as typos or incorrectly setting the option that is the correct answer. To do
this, one must click the “
Clicking the link for the tutorial will pop up a new window with the contents of the html file uploaded previously. Clicking the ‘Take Quiz’ button will step one through each multiple choice question. After all the questions have been answered, a screen will appear displaying the final score for the quiz. This page also shows each question, the answer selected, and whether the question was answered correctly or incorrectly. If the answer was wrong, the correct answer will also be displayed.
Offering a Course
Now that the instructor has a course complete with a learning that has a tutorial and questions, he or she can offer this course so that students may enroll in it.
To create a course offering, select the “Offer” tab from the set of tabs at the top of the page, this will take us directly to the ‘Offer a Course’ screen.
Here one can select the Course to be offered, give it a title, start date, end date, and optionally a password.
The title will typically be the same as the name of the course, but with some significant postfix. Here a ‘Section 001’ was added to the end of the course title, as if this Kuote course is meant to be used as part of a college course, and the given section of that course is 001.
Next the instructor must give dates of availability for the course offering. The start date is the first day that this offering will be available for students to enroll in. The end date will be the last day that the course offering and the learnings offered under it will be available to the enrolled students.
The optional password allows instructors to restrict enrollment in the offering to only those students that have been given the password, which would be a common situation. Rarely would an instructor want to allow anybody the ability to enroll in a class-related course offering.

Figure VI - Offering a Course for Enrollment
Offering A Learning
So now the course has been offered. If a student were to enroll in the course offering at this moment, he or she would find it very boring, as there is nothing else to do, no learnings to take. That is remedied by offering a learning as part of this course offering. To offer a learning, one needs to click the “Learning” side-tab under the main tab “Offer”. This brings up the first step for offering a learning. Here the instructor chooses the course offering that he or she wants to work with. After the instructor has selected the course offering to add a Learning Offering to, he or she is taken to a new page that is very similar to the “Offer Course” page that has been used previously.
Here one must choose which learning to offer, give the learning offering a title, and select a starting and ending date. For learning offerings, using the same title as the learning itself is not a problem. If one would want to offer it a second time in this course offering, something can be appended to the title to give the second learning offering it’s own distinct name.
The start date for a learning offering is the first day it will be available for students to take, and the end date will be the last day it will be available. After the ending date, the learning offering will simply disappear from the student’s list of learnings available to take.
The instructor has now successfully offered up a course with a learning for students to enroll in and explore. There are still other things one can do as an instructor, but first, it will be more enlightening to switch to the perspective of a student.

Figure VII - Creating a new Learning Offering, Selecting A Course

Figure VIII - Creating a Learning Offering, Selecting A Learning to Offer
4.3. Switching Gears: Kuote From A Student’s Perspective
Enrolling in a Course Offering
The first thing a student must do is, of course, log in. Next the student needs to enroll in a course offering. To do that, he or she will click the “Enroll” tab.
This brings up the enrollment page, as depicted in Figure IX. Here all current course offerings will appear for students to enroll in. As there has only been one course offering created, only one shows up for available enrollment.
Because the offering was password protected, the next screen presents a request to input the password. If a password had not been added to this Offering, one would have been taken directly to the enrollment verification page, where the attempt to enroll in the offering is confirmed as successful or not.

Figure IX - Enrolling in a Course Offering
Taking a Learning
The student is now enrolled in a Course Offering. To see what learnings are available to take, the student must select the “Learn” tab. Here the student will be presented with a list of learnings available to take, grouped by the course offering which they are part of. This is shown in Figure X.
If the student clicks the ‘Learn’ button on the right, he or she will be taken to a screen that displays links to the learning’s tutorial and its quiz. Clicking the tutorial link will create a new window that presents the learning’s tutorial. The ‘Take Quiz’ button will begin the learning’s quiz.
After the student has completed the quiz. A summary will be displayed giving him or her the results of the quiz. The results include each question, the chosen answer, and whether that question was answered correctly. If the question was answered incorrectly, the correct answer will be displayed.

Figure X - Choosing a Learning to take.

Figure XI - Taking a Learning, Tutorial & Quiz Links

Figure XII - Taking a Learning's Quiz

Figure XIII - Taking a Quiz, End of Quiz Results
Checking Grades
Now that the student has completed the quiz, he or she can at anytime log in and check his or her grades. To check the grades of quizzes previously taken, one must click on the “Grades” tab. On this page, the student is presented a link to view the grades of each course offering he or she is enrolled in. By taking a link from here, the student is presented with a page that shows he or she has taken a single learning quiz under this course offering. This concludes our tour of the Student Interface.

Figure XIV - Viewing Grades
4.4. The Instructors Interface: Revisited
Viewing Grades
Now that a student has taken a learning’s quiz, the instructor may view the grades of all the students who have taken that learning offering. To check grades, the instructor logs back into Kuote, and click the “Grades” tab at the top of the page.
Here the instructor will be able to decide how to view grades. At the moment one can only view grades by Learning Offering, but in the future this will be expanded to being able to view grades by Learning, Course, Course Offering, and Student as well.
When one clicks the ‘Submit Query’ button, the instructor is asked to select the relevant course, course offering, and finally the learning offering whose grades he or she wishes to view.
Once the instructor has selected the relevant learning offering, he or she is presented with a screen that gives the class average grade at the top, and each individual student’s grade underneath. Since we only have one student who has taken the learning once, the class average and the single student’s grade are the same.

Figure XV - Viewing Grades

Figure XVI - Viewing Grades, Continued
Updating Courses, Learnings, and Questions
So far, the options are available under the ‘Update’ tab have not been covered. In that section of Kuote, instructors have the ability to alter previously created courses, learnings, and questions.
5. Kuote From A Developer’s Perspective
5.1. A Bird’s Eye View
Directory Structure

Figure XVII - Kuote Directory Structure
This is the basic directory structure of Kuote. Under the root directory there are six more directories.
- Classes
- This directory contains all the classes necessary to use Kuote with the exception of any PEAR[1] classes used. Nearly all the classes in this folder are custom written and specific to Kuote.
- Config
- This directory contains configuration data necessary to run Kuote, such as the database information, the template set to use, and so on.
- Engine
- This folder contains all the files that process perform actual data processing for Kuote.
- JS
- This file holds any JavaScript files necessary to run Kuote.
- Learnings
- This directory is used to store any uploaded tutorial files for Learnings.
- Note: This directory can ‘live’ anywhere on the server, and should probably be moved for security reasons.
- Templates
- This folder contains the templates for Kuote. A given template set will have a number of PHP files responsible for processing display logic, and any CSS, JavaScript, or Image files necessary for the template set.
Within the Classes directory is a set of three more folders.
- KuoteObjects
- This is where all the classes representing differing parts of Kuote live. For example KuoteObjects_Course represents a Course in Kuote, while KuoteObjects_QuestionSet represents a collection of Questions for a given Learning.
- KuoteInterfaces
- This file contains all the interfaces for Kuote. Each class that is part of Kuote implements two interfaces, or inherits from a class that does. The two interfaces are an interface specific to that object type, such as Learning or QuestionSet, and either KuoteInterfaces_Object if the class represents a single object, or KuoteInterfaces_ObjectSet if the class represents a collection of single objects. The reasoning behind this will be detailed in the chapter Design Decisions.
- DataObjects
- This collection of classes is specific to the implementation currently used by all the Kuote classes. It is a database abstraction layer created by the PEAR library DB_DataObjects. This set of classes can be generated automatically for a number of different databases. This set was generated to work with MySQL.
5.2. Database Schema
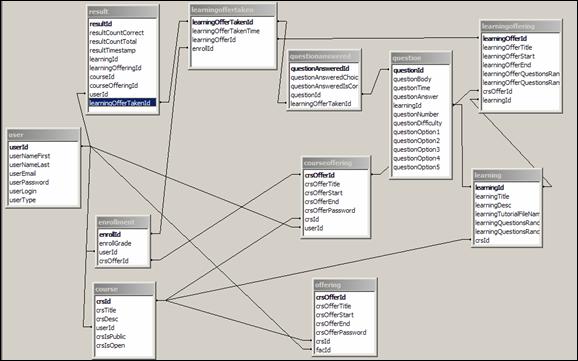
Figure XVIII - Database Schema
As one can see, the database design is reasonably complex. Beginning with an instructor, each instructor creates a course, each course can have zero or more learnings. Each learning can have zero or more questions. Each course can have zero or more course offerings, and each course offering can have a number of learning offerings each of which are an instance of a specific Learning.
From a student’s angle, each student has zero or more enrollments. Each enrollment is for a course offering. Each course offering has a number of learning offerings. When a student takes a learning offering’s quiz, it creates a learning offer taken, and a question answered for each question of the quiz.
Originally this schema was normalized to the 3rd normal form. However, that degree of normalization has been given up in favor of a bit more ease of use. For example, Result has foreign keys to the learning, learning offering, course, course offering, learning offer taken, and user id’s that are relevant to it. This allows us to look up additional information about the result with much less hassle.
5.3. How Data Flows Through Kuote
I have designed Kuote to be a simple and intuitive system. Effectively, data flows through Kuote in a linear movement, with decisions about where to branch made at different levels of the system. I have had the displeasure of working with systems files were included in a practically schizophrenic manner, never knowing what data is available when, and I have tried to eliminate that situation from Kuote.
Movement through the system depends on what kind of user the person is, and what ‘function’ and ‘sub-function’ have been passed. For example, when I click the ‘Learning’ sub-tab under the ‘Create’ main tab, the system is passed a function of ‘create’ and a sub-function of ‘learning’.
We begin with kuote.php, with is stored in the root directory. Every action within Kuote begins here. This file setups up system wide includes, magic functions, and user sessions. From here we pass control over to engine.php.
Engine.php’s primary responsibility is to create a new Template object that will be used for displaying a web page, setting up some of the template variables, and for passing the data flow to the next engine file depending on if the user is a student or an instructor.
Now let’s assume we were passed to engine.instructor.php. This file checks the function and sub-function to pass it to the last necessary engine file. If one or both of those variables is missing, it decides where there flow of data should go. However, before it does this, it reads the contents of the relevant help file and stores it in the template object.
Assuming that the passed function was ‘create’ and sub-function was ‘learning’, we will be passed to engine.instructor.create.learning.php. This file is responsible for all the actions necessary to create a new Learning.
First, it checks to see if a form of data for a new Learning has been passed. If one has not, it calls the template instructor.create.learning.form.template.php to get that information. When the user clicks the submit button, the flow of data begins again at kuote.php and passes back down to engine.instructor.create.learning.php. It will of course check again for form data, and this time it finds that data.
From here it performs all the actions necessary to create a new Learning, adds some template variables about the success of various parts of the process, and displays the template instructor.create.learning.template.php at the end. The template file checks it’s variables to displays messages of success or failure to the user.

Figure XIX - Example Data Flow
5.4. Design For Flexibility
Though I have tried to keep the design of Kuote as simple as possible, both in how it is used and how it is designed, I’ve also attempted to make the system as flexible as possible. This is why each class implements a set of interfaces. In theory, one can download the Kuote source, and have it up and running in minutes in a plain vanilla manner. There is nothing wrong with this approach. However, most institutions that would benefit from Kuote would also want to customize it. Herein lay one of Kuote’s strengths.
5.4.1.User Interface Customizability
The user interface of Kuote can easily be customized for an institution. The process can be as simple as replacing the Kuote logo with a school logo, and changing the color scheme. It may also be as complex as replacing the entire user interface with a new one, and translating it into another language.
All text and link colors are controlled by a single Cascading Style Sheet, so altering text colors is trivial. Even the images are multiple layer PNG files, so the background colors of the various tabs can be altered without creating new images from scratch.
In the current template set, each template includes at the top a universal header, and then a sub-header for the instructor interface and the student interface, respectively.
Because all the display logic is separate from the processing logic, it is also quite simple to translate the templates into another language, or to radically alter the template system. The only thing Kuote is interested in the specific name of the template’s body, such as instructor.create.course.template.php. The template file is left to its on decisions as to what to include at the top and bottom of the file. This is the only point at which Kuote deviates from the simple branching control style that it uses.
The templates are themselves written in PHP. During development, I studied many different templating systems available for the language. What I found is that they all duplicate the functionality of the PHP language itself, and create yet another language to be learned. PHP itself is an excellent choice for a templating language it one knows the correct syntax. For example, a developer new to PHP might create a something like this:
<?php
echo “<dt>Grades For “ . $courseOffering->getTitle() . “</dt>;
echo ”<dd>”;
echo ‘<table width="0%" border="0" align="center">’
echo ‘<tr><th scope="col">Learning Title</th>’;
echo ‘<th></th><th>scope="col">Grade</th></tr>’;
while ( $result = $resultSet->fetch() ) {
echo “<tr>”;
echo “<td><?=$learningsByResult[ $result->getId() ]->getTitle();?></td>”
echo “<td></td>”
echo ‘<td>’ . $result->getCorrectQuestionsCount() / $result->getQuestionsCount() .‘%</td>’;
echo “</tr>”;
}
echo ‘</table>’;
?>
However, there are constructs in place to turn a monstrosity such as this into a piece of code that is much more elegant:
<dt>Grades For <?=$courseOffering->getTitle();?></dt>
<dd>
<br />
<table width="0%" border="0" align="center">
<tr>
<th scope="col">Learning Title</th>
<th scope="col">Grade</th>
</tr>
<?php while ( $result = $resultSet->fetch() ) : ?>
<tr>
<td><?=$learningsByResult[ $result->getId() ]->getTitle();?></td>
<td>
<?=$result->getCorrectQuestionsCount() / $result->getQuestionsCount();?>%
</td>
</tr>
<?php endwhile; ?>
</table>
</dd>
As you can see, any instance of
<?php echo $myVar; ?>
can be replaced with
<?=$myVar;?>
Loops such as:
<?php
while ( $condition ) {
PHP Code
}
?>
can be replaced with:
<?php while ( $condition ) : ?>
HTML/PHP Code
<?php endwhile; ?>
and so on. PHP and HTML can be interspersed freely throughout the file. While I would never use such constructs in business logic code, but for templates, they work wonderfully.
5.5. Internal Flexibility
Kuote
has also been designed for flexibility from an internal standpoint. Because
Kuote uses DB_DataObject for database connections, we have already created one
layer of flexibility. So why wouldn’t we just use DB_DataObject throughout the
business logic code?
Perhaps the institution
already has a DBMS that isn’t supported by DB_DataObject. In this case, a
developer can add support by created a set of drop-in replacement classes that
support this DBMS. As long as the interfaces are followed, replacing the
classes should be entirely transparent to the system.
Let us assume that a university would like to implement Kuote and tie it to its existing infrastructure. Each student already has his or her login, password, and other information stored in on an LDAP server.
In this case, we would want to replace KuoteObjects_User with a new version that uses the LDAP server to gather all the user’s available information, while utilizing a MySQL database for the rest of Kuote including the user’s data such as the type ( instructor or student ) that is specific to the Kuote system.
I am planning to implement factory methods for all KuoteObjects. In this way, one could switch between a KuoteObjects_User class that uses DB_DataObject, and one that uses LDAP directly by changing a single line. In this way, Kuote’s flexibility is extended without the need to copy and move around differing classes. As long as each one implements the correct KuoteInterface files, the system does not care if the class is KuoteObjects_User_DataObject or KuoteObjects_User_LDAP.
6. Conclusions
I believe that create Kuote has been the most important learning experience I have had as a programmer. When I began this program, I knew how to program, but I did not know how to write programs. I had no idea that such a simple concept would necessitate such a complex system made of thousands of lines of code.
As a programmer who has never worked on a large program before, I was forced to learn as much be trial and error as I learned from research and study. Here are a few words of wisdom I would pass on to other programmers working on their first large project.
6.1. Use a Version Control System.
I have found version control to be extremely important for all but the simplest of programs. I began this project without any system for versioning my source code except the processed of duplicated the entire working directory and appending a date to it; A process I would do infrequently at best. As I created more and more code, I also created more and more bugs. I found myself working for hours attempting to fix a bug, and in the process trying numerous fixes and alterations to my code. After hours of this, my source code would be ugly, unstable, and no longer interoperate with other parts of the file. Often I would find myself rewriting from scratch those files that I had been working on because I had not made frequent enough backups.
Using a version control system such as CVS (Content Versioning System) or Subversion, the direct successor to CVS, is trivial and makes managing code much easier. If a project has multiple programmers a good versioning system is practically a requirement. Version controls systems will allow you to restore single files, directories and an entire project from any specified time that you committed code. Many development environments, such as Eclipse, will integrate with CVS and Subversion. This allows you to have files committed after each save, and at specific time intervals.
6.2. Use an Object Oriented Language.
This suggestion could be argued by many, but I have found programming a large project to be nearly impossible without using Object Oriented programming techniques. I began this project using standard Non-Object Oriented PHP4. I found as the project progressed that my functions were becoming huge and unwieldy, many of the functions requiring 16 arguments or more! For this reason, I created PHP4 objects and the relevant functions became methods for these new objects. Later in the project the PHP4 classes were updated to PHP5 classes to take advantage of the much improved Object Oriented syntax that PHP5 provided. After finding such elegance in Object Oriented Programming, I would find it hard to give it up for a Non-Object Oriented language.
6.3. Use a Templating System.
A large number of PHP (and other Server Side Programming Language) users tend to write PHP scripts that both process input and create output in a combined fashion. This style works fine for a student’s home page and a simple application, but fails to scale well to large projects.
I discovered this after the fact when writing Kuote. I realized quickly that I wanted to give users the ability to easily customize the visual style of Kuote, and also to allow for internationalization and translation. Most importantly, using templates seperates business logic from display logic. This allows one to take a large, complex file and break it into two smaller, simpler files that are more easily understood. This also allows one to modify the behavior of the business logic without affected the display design and visa versa.
In Kuote, the templating system is a very simple one where PHP code is used for the display logic. I believe that which template system one uses is not as important as the fact that one is being used. Choosing a templating system if mostly a matter of taste, as they all offer essentially the same basic functionality.
6.4. Write for Understandability, not Speed or Cleverness.
"Always
code as if the guy who ends up maintaining your code will be a violent
psychopath who knows where you live."
Martin
Golding.
I program primarily using a single axiomatic rule: Don’t Be Clever. Anytime I feel the urge to write clever code, I sit on my hands until the impulse goes away. Writing clever code benefits no one, least of all the original author. I have found that any code I have not worked on in a month of more might as well have been written by someone else. Writing ‘clever’ code will just make understanding that code all the more harder.
6.5. Document, Document, Document.
This goes hand in hand with the rule ‘Don’t be clever.’ You will have to revisit that old code someday, and you will wish you had documented it. There are multiple ways to document code.
My first and favorite is self-documenting code. Don’t name a variable ‘i’ if you can name in ‘tableRowCounter.’ Yes, you have to push a few more keys to create the latter variable name, but the effort is worth it next time you go bug hunting and can’t remember what the hack ‘i’ represents in that code. As a rule, a piece of code should be understandable without any other documentation. If it is not, the code should be re-worked until it is.
Of course, the is the old standby, inline documentation. Most programmers throw a comment or two into their code just because they were forced to for class assignments. I use inline documentation often, but not unless the comment adds something that was not there before. There is no point in putting the comment ‘This variable holds the counter for the number or table rows’ after declaring the variable ‘tableRowCounter,’ as the variable name was already self-explanatory.
The last type of documentation I use is a formal documentation language. By this I mean a system of programming comments that can be read by another program to automatically generate external documentation. Examples of this include JavaDoc for Java, and phpDocumentor for PHP. These systems force a syntax on the programmer and keeps the comments clean and tidy. The greatest benefit of these systems is that one can create a reference document (as HTML, PDF, or another format) for other programmers with the click of a button. The document will always be up to date as long as the code comments are up to date.
6.6. Write for Future Flexibility.
One of my goals for Kuote was for it to be simple to use and understand, as well as being flexible for customization. There are many ways to add flexibility to an application. For example, in Kuote each ‘object’ such as a User or a Question is represented by a class. The current classes use DB_Dataobject to interface with MySQL. Because I chose to use this class, Kuote can be used with a dozen or more databases including PostgreSQL, and Oracle as well as MySQL.
This design even allows for further flexibility. Suppose that a university would like to allow its faculty to use Kuote. This university already has a database of student data available via LDAP. Instead of importing that data into MySQL and keeping it constantly synchronized, one need only modify the KuoteObjects_User class to access the relevant parts of the LDAP datastore. One could even reference a website or a textfile! Part of the data could be on the LDAP server, part on the MySQL server. The customizability is endless.
6.7. Leverage Existing Libraries
By this I mean, don’t reinvent the wheel. For practically any language one might program in, there exists hundreds of free libraries out there for a programmer to utilize. This saves time developing and debugging. A library with hundreds of users is less likely to have bugs than the one written by a lone programmer for his own use.
For PHP, there is PEAR[2] (PHP Extension and Application Repository) and PECL[3] (PHP Extension Community Library). PEAR libraries are available under a number of Open Source licenses. PECL requires all submitted libraries to be under the PHP license.
6.8. Be Careful When Choosing Libraries to Use.
When evaluating whether to use a library in a project, one should ask “What are the benefits of using this library?” and “What are disadvantages of using this library?”
Shortly after I began my work on Kuote, I started using the PEAR library HTML_Quickform to generate my HTML forms. The benefit of using this library was that it gave me a very nice looking form that also had built in server and client side validation.
However, I came to discover that its detriments far outweighed its advantages. For each form I had to create such a large amount of code I began to move each form into its own function. I had dozens of extremely similar functions to make these forms. The code was messy and buggy. I had to resort to ugly hacks and kludges to keep the library working. On top of that, the system did not work well with my templating system. In the end, I spent hours removing the HTML_Quickform code from my codebase. Instead, I took the html code that was generated and stored it directly in the correct template files.
This is a warning to future developers. Never use a library just because it has some neat features, think long and hard about the benefits and consequences of any given library one might use.
7. Final Thoughts
I believe that Kuote is a viable E-Learning system written for a niche that goes unnoticed by most programmers, that of the educator whose specialty is not technology. Even so, if not a single person ever uses Kuote in practice, it has still been worth it and has provided me with valuable experience and an opportunity for me to grow as a programmer.